How to Embed React Project in a Vanilla JS Website
December 15, 2022
Why embed a react app into a vanilla JS / jQuery website?
On a recent project I wanted to develop a react component, that had to integrate into a jQuery based website. Although it’s possible to just add react to a website without any toolchain as described in the React Docs, I wanted to take advantage of all the perks of a modern dev environment and toolchain:
- Using JSX
- Importing npm modules
- Hot reload
- Transpiling (this thing needs to run on IE)
- Typescript
- Minification Etc…
So I needed a way to build a react app with a modern toolchain, and then embed the final product into an existing website, in a way that allows the website to interact with the component.
Another common use case is when you have a large existing codebase, and you don’t have the resources to convert all of it to react (or maybe you’re just not sure you like react?). Using this approach you can start slowly “starving” the old codebase, directing all new development to react, without changing existing functionality.
I will share my approach in this quick step-by-step guide.
1. Create a react app
We can take an existing react app, or start a new one with:
npx create-react-app react-embedding-test
cd react-embedding-test
npm start
You should see the basic react demo website.
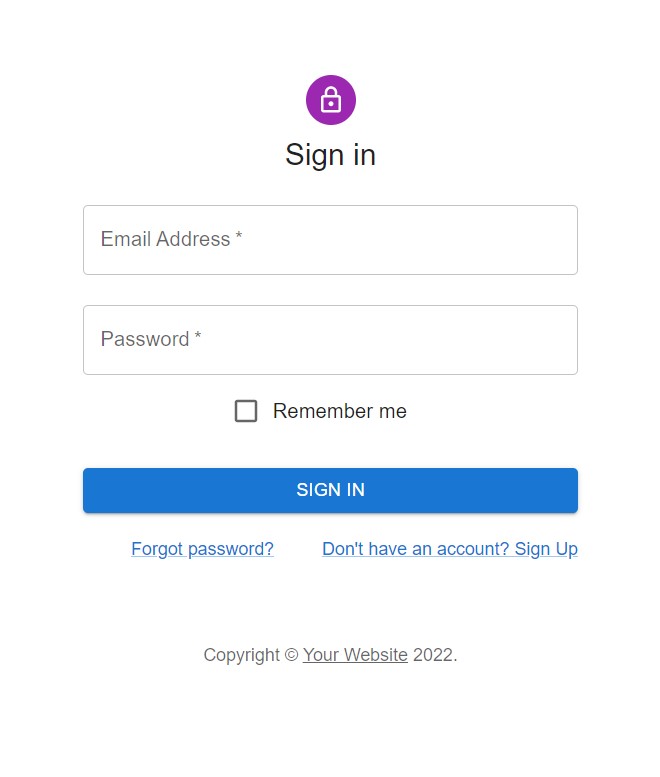
2. Add MUI sign-in page
For this example I’ll use a demo sign-in component from React Material UI, as an example of including something more complicated than the React Docs Example, using external npm components. So let’s go ahead and add the MUI npm modules:
npm i @mui/material, @mui/icons-material, @emotion/styled, @emotion/reactNow let’s just copy the sign-in example from the MUI repository and paste into a new file SignIn.js.
Then in App.js we can replace the content with the <SignIn /> component:
import SignIn from './SignIn';

function App() {
  return (
    <div className="App">
      <SignIn />
    </div>
  );
}

export default App;
Running this with npm start we should see the sign in screen:
3. Wrap the rendering function
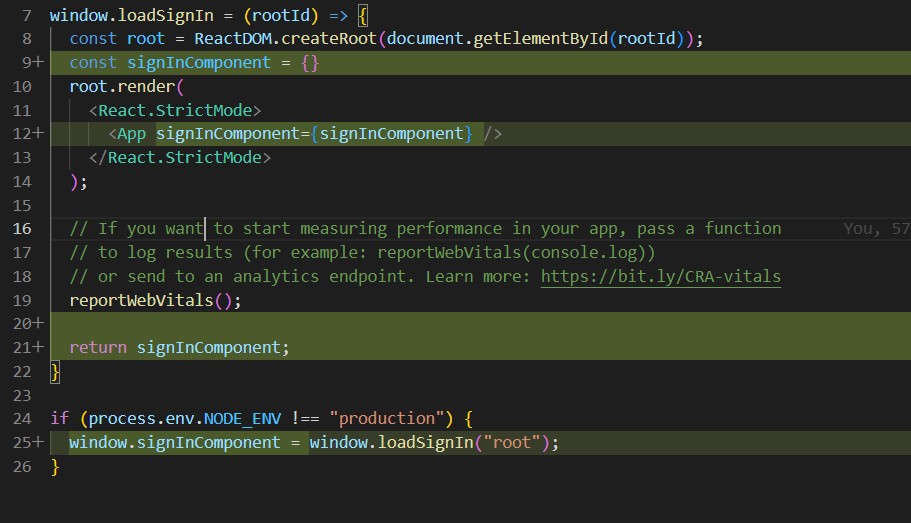
This is the crux of the solution. We’re going to wrap the code that creates the react dom with a global function, so that instead of rendering on load, it will happen only when the containing website decides.
So let’s modify index.js and add our wrapping function loadSignIn above the createRoot line:
window.loadSignIn = (rootId) => {
  const root = ...;
  root.render(...);
  reportWebVitals();
}

if (process.env.NODE_ENV !== "production") {
  window.codeBuilder = window.loadSignIn("root");
}
Notice the last
ifadded. This allows us to see the react app as usual when we’re in dev mode, but it won’t load in production mode.
4. Run a production build
So now that we have our react component, we need to run a production build using the Babel and Webpack. This comes pre-configured for us through create-react-app, so we just need to run npm run build.
The output of this will sit under the ./build directory, which contains the minified files we need to load. This includes react itself so no need to load it separately.
5. Inject react into an existing website
Now let’s create a simple demo html file to simulate our existing vanilla/jQuery website. Create a new folder vanilla-website with an empty index.html file.
The content of the file will be:
<!doctype html>
<html>
    <head>
        <link rel="stylesheet" href="../build/static/css/main.073c9b0a.css"></link>
    </head>
    <body>
        <script src="../build/static/js/main.3b1b56e9.js"></script>
        <div id="react-root"></div>
        <div>
            <button onClick="window.loadSignIn('react-root')">Load React Component</button>
        </div>
    </body>
</html>
We’re loading the main.<hash>.css and main.<hash>.js files, a div react-root for injecting the react code, and a button that calls the function loadSignIn we exported from the react app.
Note: the hash numbers will change with each build.
That’s basically it! Opening the html file and clicking the button will show the sign in screen.
Bonus: Export functions from the component
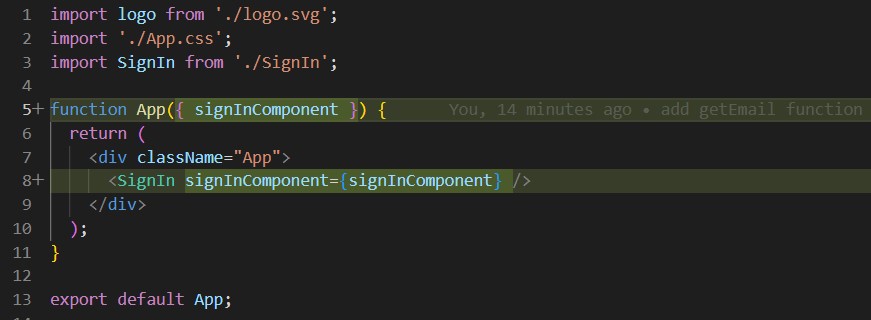
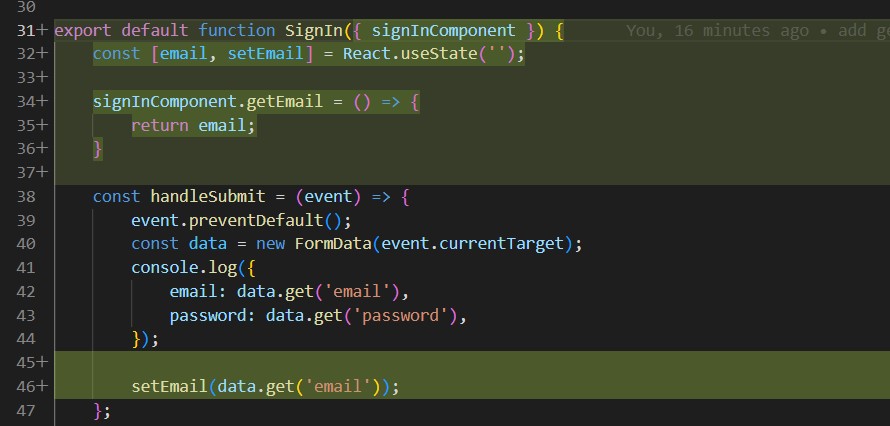
In a real life situation we’d probably want to have access to some internal state that the component wants to make available. For this we can return an object from the loadSignIn function, and augment it with functions from within the react app.
So let’s first add this return object in index.js, both sending it as a prop into the App component, and returning it from the function:
And now we need to add the prop in App.js, and propagate it again down into SignIn component:
In the SignIn.js file, we’ll add a simple state that holds the email that was submitted:
Finally in index.html we need to add a button to invoke the function and display the email:
<button onClick="window.signInComponent = window.loadSignIn('react-root')">
  Load React Component
</button>
<button onClick="alert(window.signInComponent.getEmail());">
  Get Email
</button>
And now you should see an alert when clicking the button (after submitting through the sign in app).